Environmental Math
Cross-curricular lessons for grades 4, 5 and 6
One of my assignments during my Bachelor of Education was to create something that made math classes more engaging. Learning math can be wonderful in itself, but if we're going to be honest, many people find math difficult and abstract. Math learning can be fun (hence the 'math olympics' final assessment I created during by grade 1/2 practicum) but for me, it needs to be relevant. If I'm going to teach a concept to students, I need to be able to back up why it's important that we learn about it. For me, that means making it visual and purposeful. In response to the assignment, I created something for myself I knew I would use in the future. I combined environmental education, school initiatives and science/math curricula. I put together a binder of year-long plans for students in grades 4, 5 and 6 combining all math curricula and pairing it with an age-appropriate environmental issue and tying it to a positive school initiative. Luckily for me, it received rave reviews by one of the best teachers I've ever met, Ms. Joan McDuff.
Text reads top left corner clockwise:
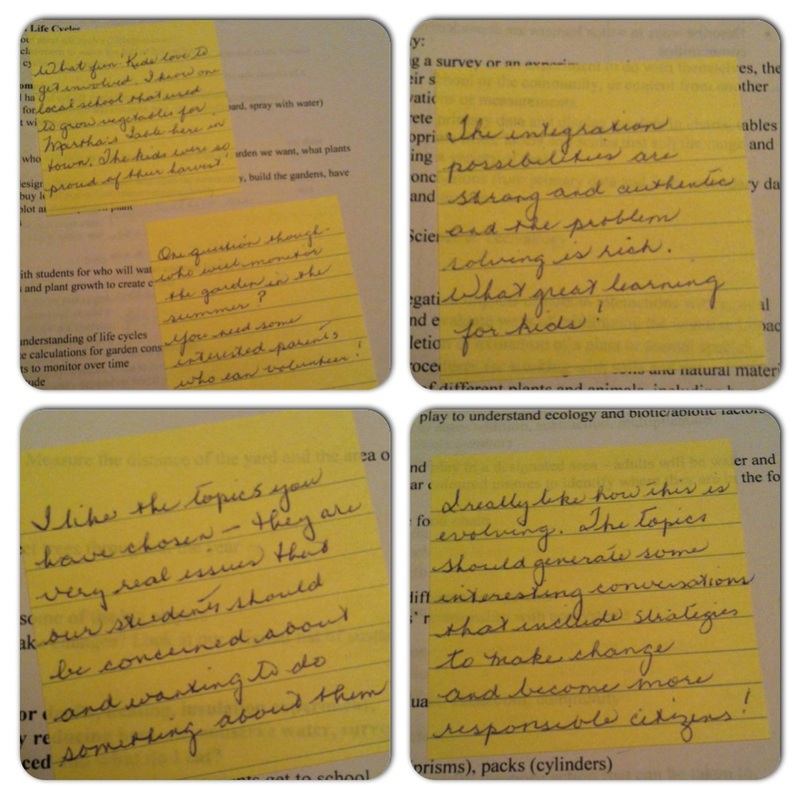
1. "What fun! Kids love to get involved. I know one local school that used to grow vegetables for Martha's Table here in town. The kids were so proud of their harvest. One question though - who would monitor the garden in the summer? You need some interested parents who can volunteer!"
2. "The integration possibilities are strong and authentic and the problem solving is rich. What great learning for kids!"
3. "I really like how this is evolving. The topics should generate some interesting conversations that include strategies to make change and become more responsible citizens!"
4. "I like the topics you have chosen - they are very real issues that our students should be concerned about and wanting to do something about them."
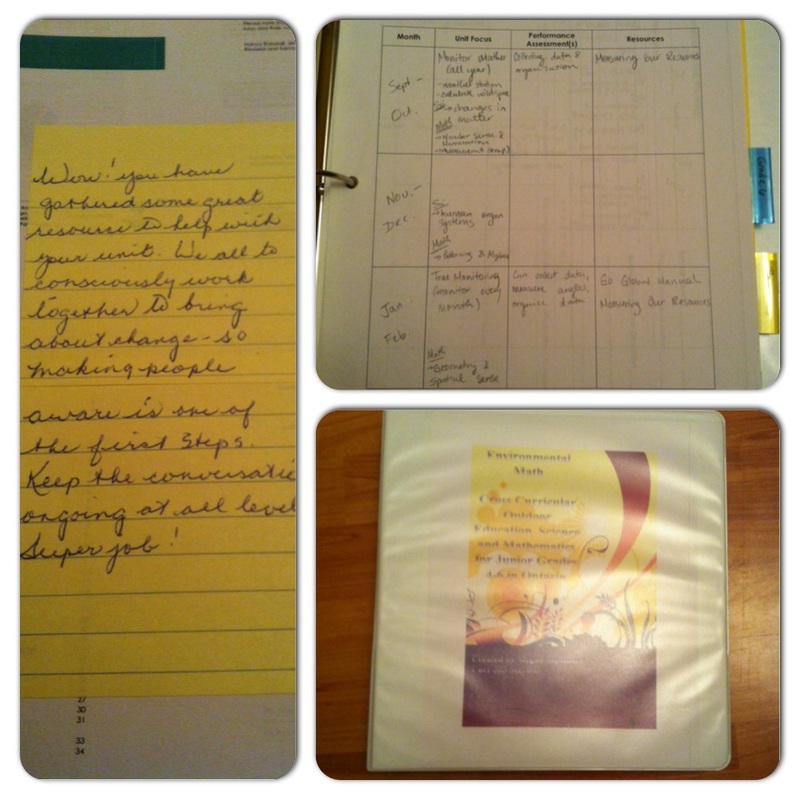
Text reads: "Wow! You have gathered some great resources to help with your unit. We all [need] to consciously work together to bring about change - so making people aware is one of the first steps. Keep the conversations ongoing at all levels. Super job!"
One example of the work involved is in the grade 6 section focussing on ecology, food chains and our effects on those systems. Students are to play an interactive ecology simulation game, play the survival game as a animal and complete activities from Operation Water Spirit and Connecting with Nature. This unit is great because it combines hands-on learning and technology assistance to help with learning. To learn more about using technology to help learn natural science, please see the article I wrote for my curriculum science class during my Bachelor of Education.
One example of the work involved is in the grade 6 section focussing on ecology, food chains and our effects on those systems. Students are to play an interactive ecology simulation game, play the survival game as a animal and complete activities from Operation Water Spirit and Connecting with Nature. This unit is great because it combines hands-on learning and technology assistance to help with learning. To learn more about using technology to help learn natural science, please see the article I wrote for my curriculum science class during my Bachelor of Education.
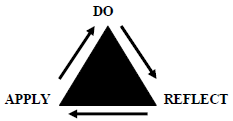
Apply, Do, Reflect
Using reflective techniques to transform learning
Specializing in the Outdoor & Experiential Education program at Queen's University meant I had one practicum in each of my teaching divisions, one outdoor/environmental practicum and one of my own choice. I spent my third practicum teaching outdoor and environmental education at the H.R. Frink Centre for the Hastings and Prince Edward District School Board. Within my first week I observed how busy each day was with visiting students and teachers. Classes would arrive around 10:00am and would have approximately two hours in the morning and were lucky if another hour fit into the afternoon schedule before the bus would arrive for pick-up. This often meant that programming was packed with little to no reflection on the activities. For my Action Research assignment, I observed children who went without reflection and those who did under my facilitation. I prepared a document to be used by the centre in order to incorporate more reflective practices into their teachings. The Importance of Reflection Outside of Outdoor & Environmental Education Settings was to be sent to each visiting teacher in advance of their booked trip.
In essence, the article explained to visiting teachers how reflection relates to teaching, what frontloading and debriefing are, how to use reflection to make curriculum connections and assess students and the positive effects reflective thinking can have on a student's success. Following these are three pages of reflection activities that can be used for many 'teachable moments' and require little to no materials or pre-planning.
One example of an activity I included is the use of a physical comfort circle. In my experience, I have created a comfort circle using a piece of chalk on asphalt). Students create a three ringed circle like so:
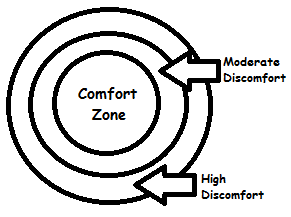
The middle of the circle represents their 'comfort zone' or where they feel no anxiety of stress. The middle ring represents moderate discomfort, which is often where students do the most learning (especially if we are relating this to Vygotsky's Zone of Proximal Development). The outer ring represents high discomfort or anxiety. When I completed this activity, the instructor asked us to draw a personal comfort circle and then listed several activities we had completed throughout the day. We were required to stand where we 'felt' within our circle to physically demonstrate how we felt on an emotional level during each activity. It was fascinating to watch how others felt during each activity and it was a simple and quick way for the instructor to get a sense of the student's response.
Heritage & Identity
Grade 1/2 Social Studies
My second teaching practicum during my Bachelor of Education was in a Grade 1/2 split class. During that time I finished up the measurement unit in mathematics, played co-operative games in phys-ed and taught social studies. I was excited to share what each of our families were like and what traditions we celebrate at home with a multi-cultural class.
The unit had 4 major parts:
1. Interactively learn about another culture's holiday using the SMARTboard
2. Participate in a morning lesson following the new Social Studies Ontario Curriculum
3. Share one item from home that relates to a holiday or tradition your family celebrates
4. A holiday potluck to wrap up the unit
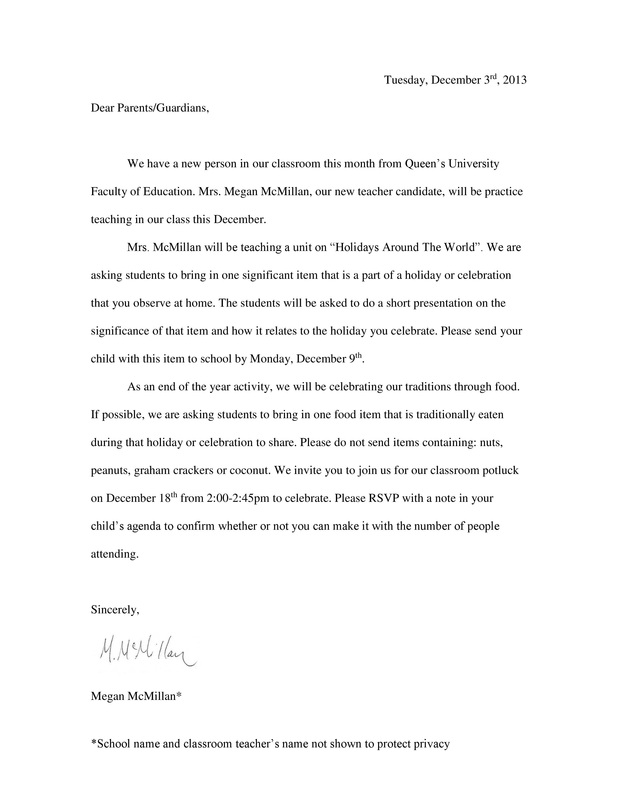
This letter was sent home to inform families of our new learning. (see left)
Part 1: Holidays Around the World
Each morning the students were greeted at the classroom door and went to their desks to begin independent reading. After a short period of time we all met at the carpet for morning message. The students would help me correct the message based on the theme of the day (spelling, grammar, etc). Then they would turn to the SMARTboard and learn about one holiday around the world. Stars were set in different countries around the world where certain holidays are predominantly celebrated (though by no means exclusive). Students were chosen to touch a star and be transported to that place.
The unit had 4 major parts:
1. Interactively learn about another culture's holiday using the SMARTboard
2. Participate in a morning lesson following the new Social Studies Ontario Curriculum
3. Share one item from home that relates to a holiday or tradition your family celebrates
4. A holiday potluck to wrap up the unit
This letter was sent home to inform families of our new learning. (see left)
Part 1: Holidays Around the World
Each morning the students were greeted at the classroom door and went to their desks to begin independent reading. After a short period of time we all met at the carpet for morning message. The students would help me correct the message based on the theme of the day (spelling, grammar, etc). Then they would turn to the SMARTboard and learn about one holiday around the world. Stars were set in different countries around the world where certain holidays are predominantly celebrated (though by no means exclusive). Students were chosen to touch a star and be transported to that place.

Part 2: Social Studies Lessons
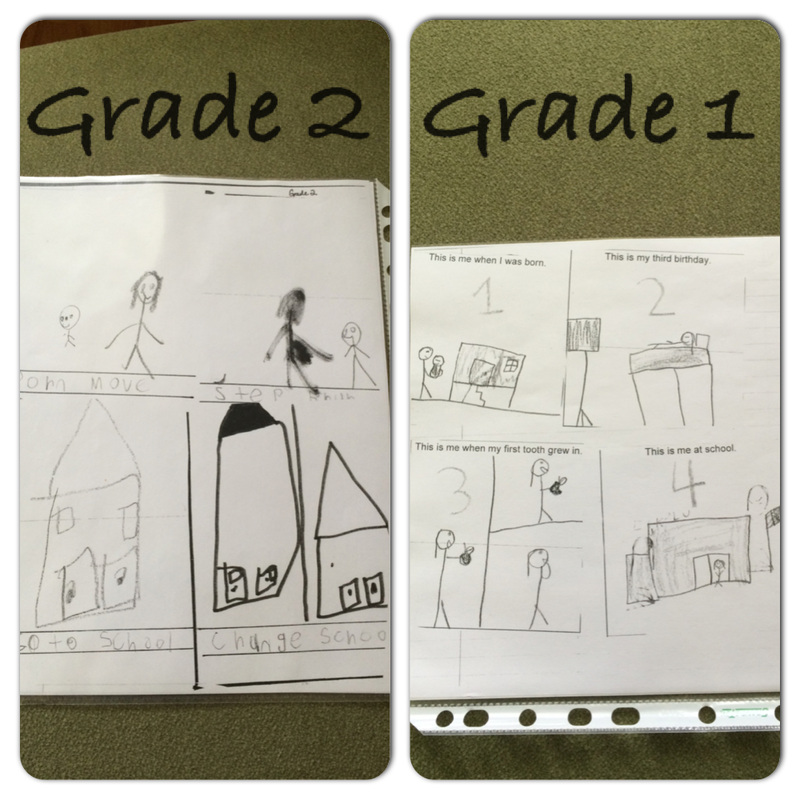
The children participated in learning about a variety of social studies topics including: sequencing of time, significant life events, varying family structures, identifying significant people, places and things in their lives, describing their own roles and responsibilities, and identifying elements of respectful everyday behaviour. One example of a lesson is when students were asked to think about significant events in their lives and put them in order. The grade 1's were prompted with major life events and the grade 2's were asked to come up with their own. Work was differentiated accordingly to grades/abilities. |
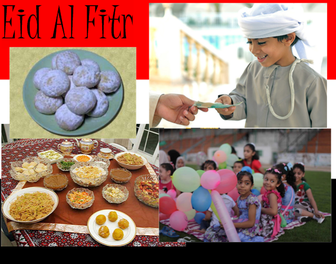
In this example, the students were transported to Egypt to learn about Eid Al Fitr. They were taught some of the traditions people who celebrate Eid go through as well as food eaten during that holiday. We had two students in our class that celebrated Eid and they were thrilled to see a major holiday they celebrate turn up in class. The two girls were happy to share what they do during Eid in their homes.
|
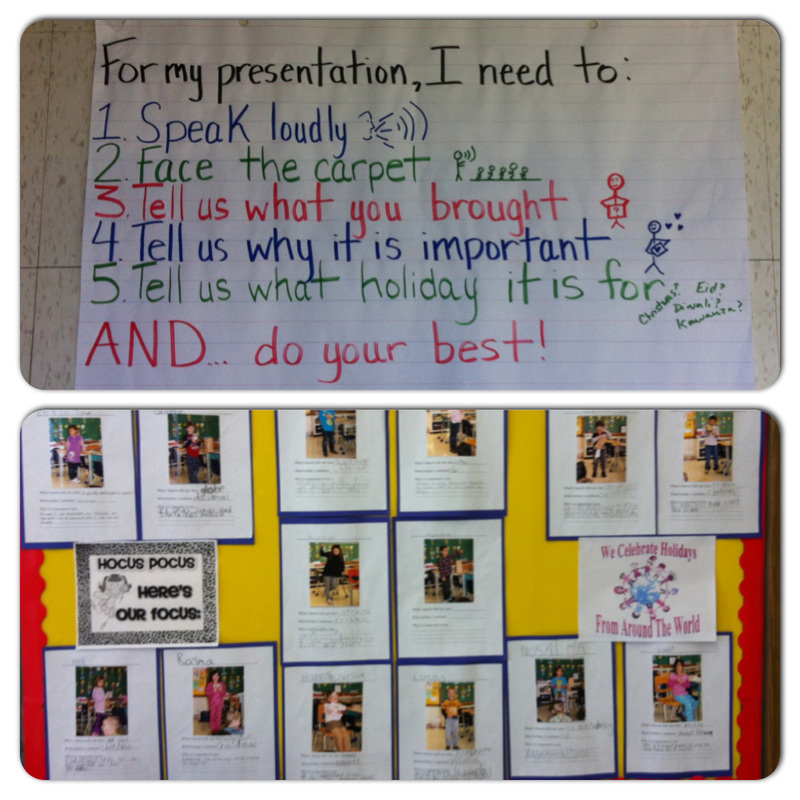
Part 3: Presentations
The students had never presented in front of the class. We co-created our goals for each presentation and I created a simple rubric , one for each grade. Approximately 3 students presented their items of significance each day. I was so grateful to parents for helping us put this together and letting their children bring items into the class to share. We all made sure each item was taken care of and tried to make each student feel comfortable presenting in front of the class. When all of the students had presented, we created a board with a photo of each student, what they brought, what holiday they celebrate and why it's an item of significance to them.
The students had never presented in front of the class. We co-created our goals for each presentation and I created a simple rubric , one for each grade. Approximately 3 students presented their items of significance each day. I was so grateful to parents for helping us put this together and letting their children bring items into the class to share. We all made sure each item was taken care of and tried to make each student feel comfortable presenting in front of the class. When all of the students had presented, we created a board with a photo of each student, what they brought, what holiday they celebrate and why it's an item of significance to them.
Part 4: Holiday Potluck
In order to prepare for our potluck we did some preliminary things. I sent out a letter with the help of my associate teacher to the parents to inform them of the unit I was teaching and that there would be a potluck before December holidays. In the letter I outlined several foods that children are allergic to that may not be present in the food brought in. We also made invitations for each for our families.
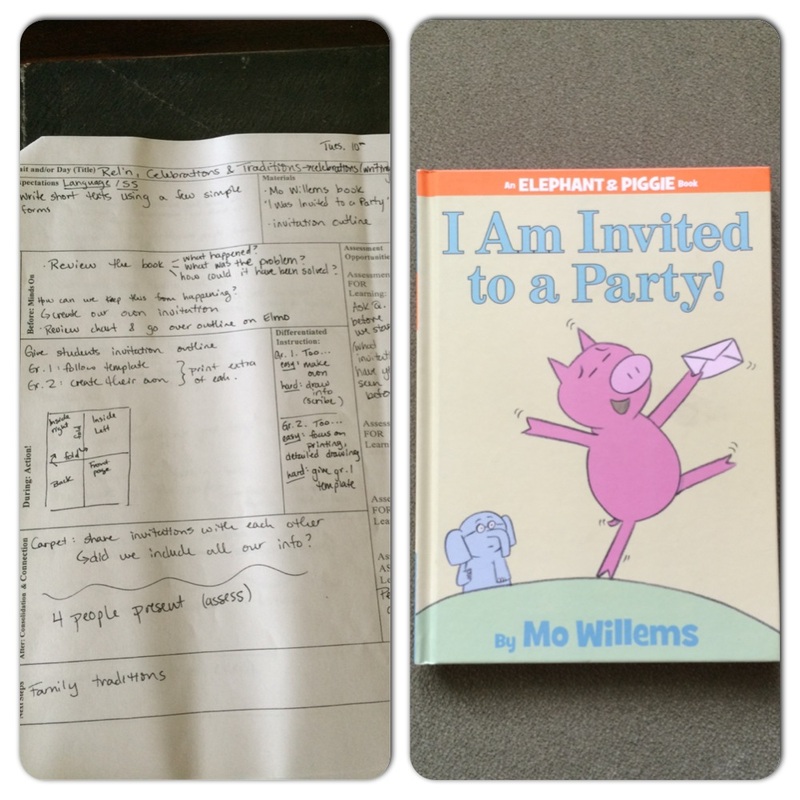
We started by reading "I Am Invited To A Party!" by Mo Williems. This class loved Gerald & Piggy so this book choice was a hit. We read the book together and talked about why Gerald & Piggy felt confused about what to wear. We decided we would bring home invitations to our families to outline what our party would be like so no one would be nervous or confused. (Lesson plan and book pictured below) Families kindly RSVP'd to our invitations and we planned the party based on how many people were coming.
In order to prepare for our potluck we did some preliminary things. I sent out a letter with the help of my associate teacher to the parents to inform them of the unit I was teaching and that there would be a potluck before December holidays. In the letter I outlined several foods that children are allergic to that may not be present in the food brought in. We also made invitations for each for our families.
We started by reading "I Am Invited To A Party!" by Mo Williems. This class loved Gerald & Piggy so this book choice was a hit. We read the book together and talked about why Gerald & Piggy felt confused about what to wear. We decided we would bring home invitations to our families to outline what our party would be like so no one would be nervous or confused. (Lesson plan and book pictured below) Families kindly RSVP'd to our invitations and we planned the party based on how many people were coming.
Needless to say our party was a hit! We had a ton of food and almost all families were able to attend. The classroom was packed! It was so nice to have the student's families in the classroom. I learned so much about the children by giving them an opportunity to share what's important to them at home. I think the families really appreciated coming to see their children's classroom and see what their children were learning each day. I felt a real sense of community that day. Although we didn't all share the same language, we all loved the children in that classroom and enjoyed the diversity of food brought in by our parents.
Block Play in Kindergarten
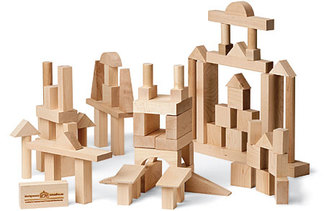
There is a mountain of evidence that block play is critical for children's development. So can you believe the team of Kindergarten teachers I worked with had very few or no blocks? Whoops! The shift from play-based learning to traditional academics in Kindergarten is coming around full swing and more and more educators are encouraging play in their classrooms. Blocks are one of the staples required for development and they're a beautiful, open ended toy that allows for creative play. Just some of the benefits of block play are listed here, here and here. The team of FDK teachers I worked with decided to focus their Collaborate Inquiry group on block play this year. Wooden blocks and three carts were purchased to be shared between 6 classes. They arrived shortly after Christmas and we were more than eager to give them to the kids.
I created three stages in order to scaffold learning. In my classroom we started with free block play. There were several rules for the kids to follow for safety reasons, but other than that, they were welcome to choose who they played with and what they built. I observed the children, reminded them of safety rules and documented their progress. I was able to approximately rate each child at which developmental stage they were at.
Stage 1: Tote and carry blocks
Stage 2: Building begins
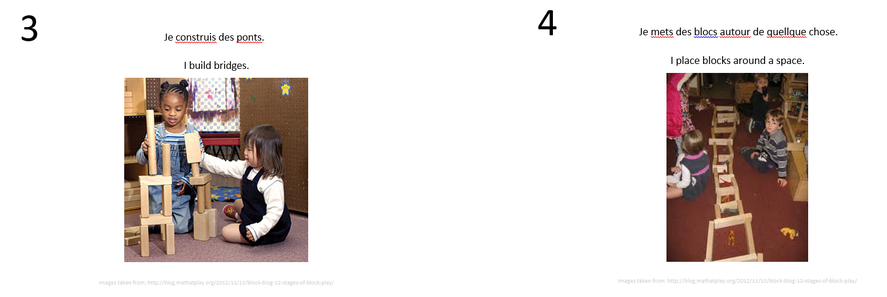
Stage 3: Bridges form
Stage 4: Enclosures and fences
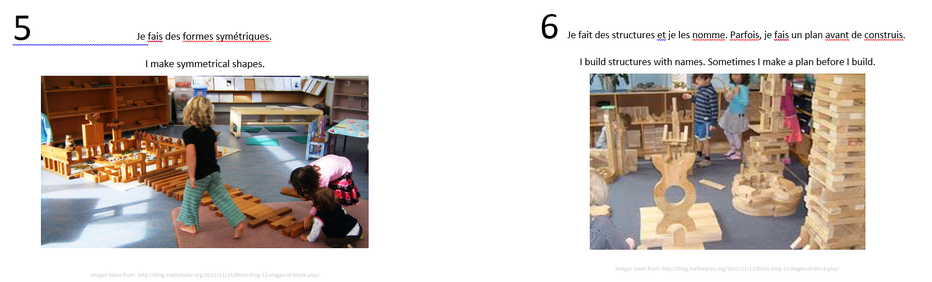
Stage 5: Representational buildings
Stage 6: Complex buildings
My colleagues created an incredible document with details of each stage, questions to prompt students with, suggested materials to incorporate, and subjects that can be derived from block play. Their document Developmental Stages of Block Play can be found here.
My second step was to group together the students at the same level of play. This time I began documenting students by taking photos and videos with the iPad, prompting them with questions to increase the level of creativity, complexity or language surrounding their structures. It was here that I also began to introduce self assessment. I labelled each cart with pictures of the six stages and simple sentences in both English and French that teachers could read to their students. Students were required to examine their structure after they finished building (or the time period ran out) and analyze what level they were at.
I created three stages in order to scaffold learning. In my classroom we started with free block play. There were several rules for the kids to follow for safety reasons, but other than that, they were welcome to choose who they played with and what they built. I observed the children, reminded them of safety rules and documented their progress. I was able to approximately rate each child at which developmental stage they were at.
Stage 1: Tote and carry blocks
Stage 2: Building begins
Stage 3: Bridges form
Stage 4: Enclosures and fences
Stage 5: Representational buildings
Stage 6: Complex buildings
My colleagues created an incredible document with details of each stage, questions to prompt students with, suggested materials to incorporate, and subjects that can be derived from block play. Their document Developmental Stages of Block Play can be found here.
My second step was to group together the students at the same level of play. This time I began documenting students by taking photos and videos with the iPad, prompting them with questions to increase the level of creativity, complexity or language surrounding their structures. It was here that I also began to introduce self assessment. I labelled each cart with pictures of the six stages and simple sentences in both English and French that teachers could read to their students. Students were required to examine their structure after they finished building (or the time period ran out) and analyze what level they were at.

For a period of a few weeks students were able to build with other students at their level. This stage was a bit of a flop. The children didn't learn much from one another and those below level 5 or 6 had difficulty planning. I tried to introduce a paper plan to our more complex builders and (as I should of known) they hated sitting down and planning on paper; they wanted to talk it out instead and experiment as they built.
I realized this was not the best choice in order for students to learn, so I created stage three, multi-level groups. This was more of a challenge for the students, because they were not always in their core friend group and at times it was frustrating for those who were more than 1 level different in building complexity. I made sure to supervise each group, continue using prompting questions and documented each building session.
I realized this was not the best choice in order for students to learn, so I created stage three, multi-level groups. This was more of a challenge for the students, because they were not always in their core friend group and at times it was frustrating for those who were more than 1 level different in building complexity. I made sure to supervise each group, continue using prompting questions and documented each building session.
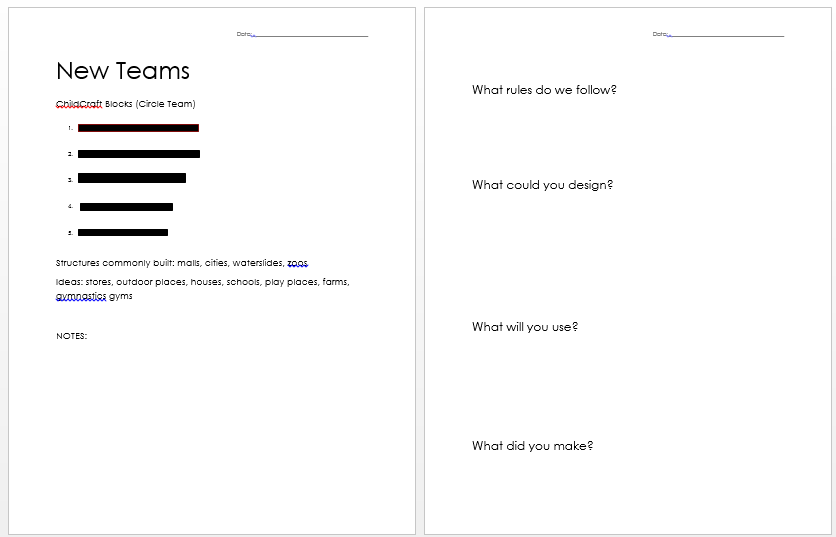
This time I could see children moving up in levels because they were learning from one another. I changed from a paper plan in stage two, to an oral group plan. Each time I asked the students to remind me of the rules (for safety), asked them for design ideas (challenging them not to always build a mall or city), asked them what kind of blocks they will use and followed up the end with videotaping "What did you make?". The students worked hard together in their groups and looked forward to block building time. Other documents were introduced to help students with creativity including the "I Can" book and the Fun-A-Day Structure book.
This was a particularly important session for our student who we suspected was on the ASD spectrum and often needed assistance with social cues. My favourite moment from this centre, was when the student insisted they build what he wanted and the group (very politely) all explained how they needed to build what everyone wanted. I could see the gears turning and it was a big moment for our little guy to consider that he needed to think of what others wanted to do during play time. More information on the importance of block play and ASD students can be found here.
There were some major takeaways for me in our wooden block experiment:
- Students learn best through peer mentoring
- The less paperwork = the better
- Children need experiences in order to come up with creative ideas
- Sometimes it's okay to improvise during play - we don't always need a plan
- Blocks are vitally important for developing spatial skills, motor skills, language skills and social skills
